Using Adobe Premiere Pro CC 2015.3/CS6/CS5 with Canon XA10 AVCHD files
If you encountered problems with importing XA10 AVCHD to PPro CC 2015.3, CC2015.2, CS6, CS5 on Mac OS X ( El Capitan included), please follow this post to effortlessly convert Canon XA10 MTS to MPEG-2 for Premiere Pro CC/CS6/CS5 with keeping multi audio channels.
I have collected several HD camcorders, I like them very much. Canon XA10 is the one of them. It is a good and inexpensive cam. But from googling, I found many users meet the incompatible problems about the recorded AVCHD videos. If try to import the HD .mts/m2ts recordings to some movie editing softwares for further editing, they will see the error message "The files are unsupported". For example "I got Canon XA10 several years ago. The format shows AVCHD Video (.MTS) - into Adobe Premiere. I have updated my Premeire Pro CC 2015.2 to CC2015.3, running on Windows 7, 32bit. I got know Adobe Premiere CC 2015.3 and later work with AVCHD video, but require a 64 bit computer. So, I have to convert the files. When I convert .MTS to another format do I lose lots of quality? That is my only worry." 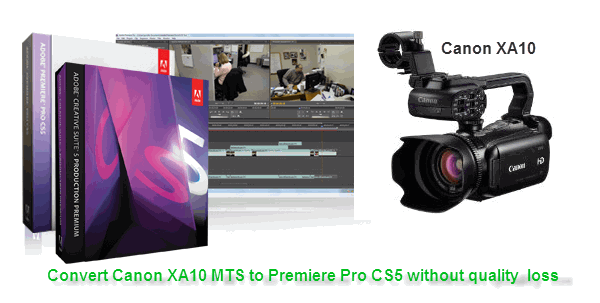
In fact, I have used many AVCHD camcorders and I have met the similar trouble many times. I know the main reason is that AVCHD is a compressed format. We need to use a plugin to help me recognise and trnascode it to Adobe's native format. In general, we can use AMA to do that, but it doesn't work well with our computer sometimes. If it doesn't work well, what will you do? Here you’re advised to get this smart MTS to MPEG-2 Converter, which can aid you to change AVCHD (*.MTS) files to standard MPEG-2 format for PPro CC/CS6/CS5/CS4 for easy editing without losing any quality. 
 (Note: Click here for OS X 10.5)
Easy Guide on Converting Canon XA10 MTS recordings to PPro CC/CS6/CS5 fomat without quality loss 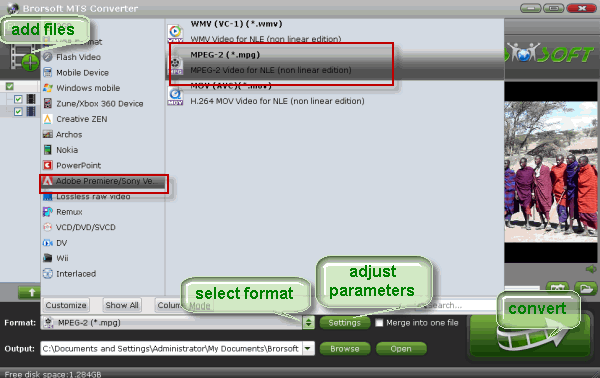
Step 1: Get the MTS/M2TS Converter for Adobe and install it on your computer. Run it and import your XA10 MTS files to it.
Step 2: Hit the Format box and select Adobe Premiere/Sony Vegas > MPEG-2 (*.mpg) as output format on the drop-down menu.
Step 3: For editing XA10 1080p AVCHD in Adobe Premiere, the best Frame Rate is 30fps, so we recommend you set 1920*1080 as video size and 30fps as Frame Rate on the Profile Settings. 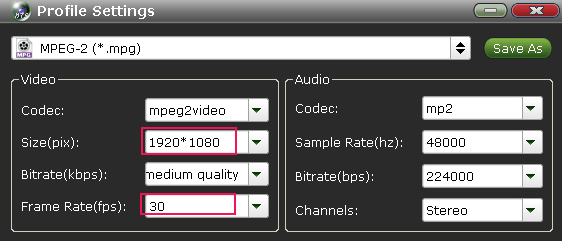
Step 4: Click the Convert button to start transcoding XA10 AVCHD to MPEG-2for Adobe Premiere Pro CS5 with the best settings immediately.
After conversion completes, you can easily get Canon XA10 footages to Adobe Premiere Pro CC/CS for smooth editing as you want. No worry about any quality loss.
Tips on AVCHD Converter for Premiere Pro:
1. Joining files: Tick the box "Merge into one" on the main interface.
2. Preview: Double click on the file and you can get a preview on the converter.
3. Crop: Edit --> Crop and you can get the imported videos cropped as you want.
4. Auto shutdown: Click Option and tick the box “Shut down the computer after conversion” before conversion starts.
Related guides:
Import Canon XA10 files to Avid Mac
Transfer Canon XA10 AVCHD to FCP
Get Sony VG10 AVCHD to Adobe PP CS3
Transcode 1080p AVCHD to MPEG-2 for Adobe
Converting MTS to ProRes/WMV for Pluraleyes
Why MTS/M2TS files not reading in Premiere Pro?
Make Sony XR150 AVCHD editable in Adobe PPro
Import Sony A7S AVCHD videos to Apple Aperture 3
Can’t Import C500 4k MXF to Premiere Pro CC 2015.3
Convert MXF files to Apple Aperture 3 ProRes MOV on Mac
Edit Canon C100/C100 Mark II MTS files in Premiere Pro CC
Convert Sony RX100 AVCHD video clips to Apple Aperture 3
Editing Sony FS700 AVCHD files in Premiere Pro CC/CS6/CS5
Brorsoft MXF Converter Big Discount for Back-to-School Season 2016
Brorosft MXF Converter is a professional Mac MXF Converter with its simple and efficient MXF conversion workflow. Don’t want to spoil the HD of your footage from your camcorder? Try this MXF Converter, it won’t let you down. NELs like FCP, Adobe Premiere, and Sony Vegas all can be supported as well as some mobile devices.
To show our thanks to our products users, we are all thinking how to make this year’s Back-to-School Season special with special gifts. Now give you the big discount on Brorsoft MTS/M2TS/MXF Converter for Wins and Mac.
These new prices are being available from August 1, 2016 to December 31, 2016. During this period, we will continue to introduce more discounts on special days, please stay tuned official website updates (http://www.brorsoft.com).

 |
Brorsoft MTS/M2TS Converter / Mac | |
| Convert/Transcode/Merge MTS clips to any regular formats like MP4, MOV, AVI, WMV, MKV, FLV, 3GP, VOB and more for editing or playback anywhere. | ||
  |
||
|
Now: $29.95 |
Saving: $6 | |
More Discount You May Interested in:
 |
Brorsoft MXF Converter / Mac | |
| Convert/Transcode/Merge MXF files to WMV, MP4, MPEG, AVI and more with fast speed and lossless quality. | ||
|
||
|
Now: $29.95 |
Saving: $6 | |
Additional Tips: Get an extra $5 price off
 |
Share this page in your Circle and get an extra $5 COUPON for buying any brorsoft product. |

Back to school is one of the biggest retail seasons of the year. So don't miss this change.
![]() Ordering online is 100% secure! All data exchanged during the payment process is SSL-secured.
Ordering online is 100% secure! All data exchanged during the payment process is SSL-secured.
![]() Our system will automatically send the registration info to your e-mail address once your order is validated.
Our system will automatically send the registration info to your e-mail address once your order is validated.
![]() If you have other questions about ordering, please get more information on Order Help or Chat with Online Sales for more information before you purchase!
If you have other questions about ordering, please get more information on Order Help or Chat with Online Sales for more information before you purchase!
![]() Need Multi-User License? Please contact us ( email to support@brorsoft.com ) for the purchase link.
Need Multi-User License? Please contact us ( email to support@brorsoft.com ) for the purchase link.
Transcode MKV to Windows (Live ) Movie Maker WMV, AVI format Playback Tips
Come and Read this MKV to Windows Movie Maker guide offers you the best solutions on converting MKV to Windows Movie Maker for further editing with ease.a
As we all know, Windows Movie Maker is a freeware video editing software by Microsoft. You may use it to create your own masterpiece. The point here, sometimes, you will find it a painful experience while importing MKV into Windows Movie Maker. And there are some frequently asked question quoted as below.
Q1: “Movie maker only recognizes MKV audio, but not the video.”
Q2: “Any recommendations on a piece of software that converts a .mkv file to something that is compatible with Windows Live Movie Maker?” 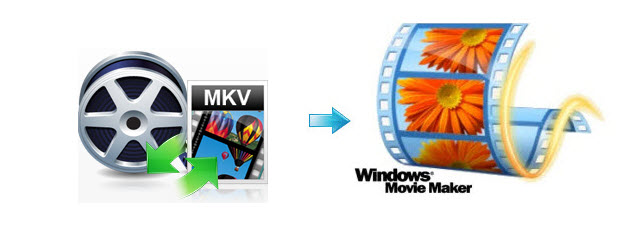
Do you also have such hassles when playing or editing the MTS files? If so, hopefully the instructions below can help you out of troubles. Since Windows Movie Maker only supports WMV, ASF, MPG (MPEG-1) and AVI (DV-AVI) video formats, in order to edit MKV video files in Windows Movie Maker, you need to convert MKV to Windows Movie Maker supported video formats first. To finish the task, you can use Brorsoft Video Converter, the best video converter that can help you transcode MKV to Windows (Live) Movie Maker WMV, AVI, etc. with high output video quality. Download it now and follow the steps to convert your MKV videos to Movie Maker for editing. 
Read More in this blog...
How to Add subtitles to AVI?
Guide Converting Sony 50P MTS to smooth 25P MP4
How to get YIFY MKV files onto Android tablet/phone
How to convert MOV to WMV for Windows Movie Maker
Work with the Pentax K-3 II MOV in Windows Movie Maker
[Guide] How to import MKV files into Windows Movie Maker?
1. Add MKV movies
Run the MKV to Windows Movie Maker Coverer; click the Add button to load .mkv files to the program from your computer. You can also directly drag the video files into the program. 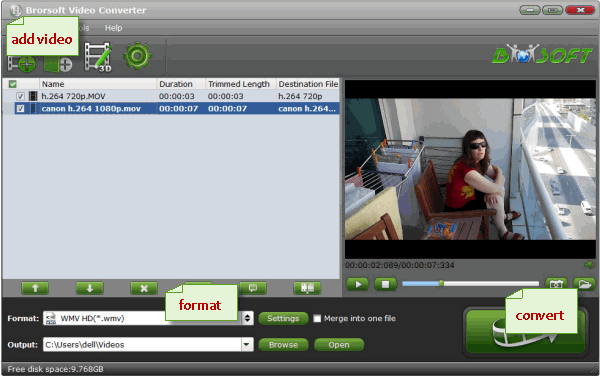
2. Select the output format
Hit the Format box and select HD Video –>WMV HD(*.wmv) on the dropdown menu as output format. Besides, you can also choose Divx HD(*.avi) as output if you have not installed the .wmv codec. 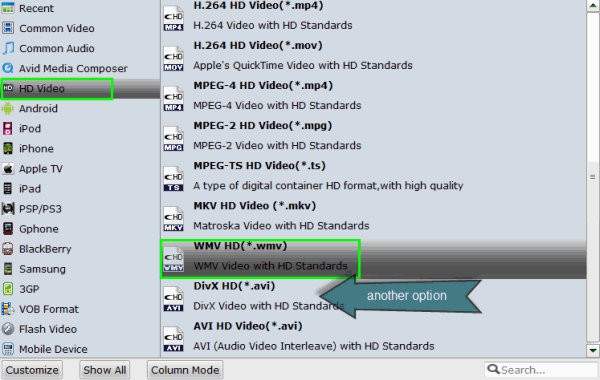
Tip: Click the "Settings" button and customize proper video/ audio parameters if necessary. 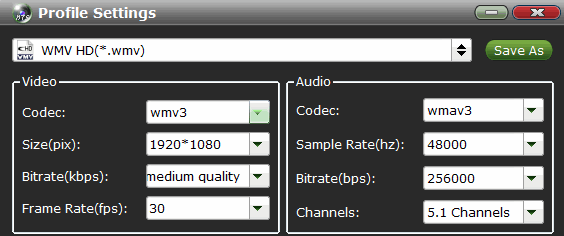
3. Start to convert MKV to Windows Movie Maker
Simply click the Convert button to start encoding MKV video to Windows Movie Maker friendly video formats. Within several minutes, you can find the converted file on your computer by clicking the “Open” button. And then you can import the converted files to Windows Movie Make for editing via its “Import video” option.
Additional Tips:
The versatile MKV to Windows Movie Maker Converter is not only designed for converting MKV files for Windows Movie Maker. It is also professional in making MKV, AVI, MTS, MXF, MPG, etc files editable in Adobe Premiere Pro, Adobe Premiere Elements, Avid Media Composer, Sony Vegas Pro, After Effects, Magix Movie Editor Pro, Pinnacle Studio, CyberLink PowerDirector, etc to meet your different needs.
See also:
MKV to Sony Vegas
MKV to Pinnacle Studio
MKV to Sony Movie Studio
MKV to Avid Media Composer
Can iTunes 11 support WMV, VOB format?
Solve Sony TV won't Play all types of MP4 files
Plex Media Server doesn’t play MP4 file- Solution
Tips Playing GoPro Hero 4k/1080p files on iPhones
How to get YIFY MKV files onto Android tablet/phone
Best Solution to Import and Edit DVD in Premiere Pro CC/CS6
Rip Blu-ray/DVD to MKV Losslessly with MakeMKV Alternative
Convert MKV to MP4 with subtitles for iPhone 6S Plus, Galaxy S7, PS4
How to get YIFY MKV files onto Android tablet/phone
Summary: The article shows you the easiest way to convert YIFY MKV movies to Android tablet or phone supported video formats for smooth playback. Learn details now.
Most of the Android gadgest like Samsung Galaxy Tab, Nook HD, Kindle Fire HD, Galxy Note are great for watching movies. The following guide aims to show you how to get your YIFY MKV movies onto Android tablet or phone to have more fun.
Method 1. Convert YIFY MKV to Android compatible format
Neither Android phones nor tablets support playing Yify MKV files well, Thus, in order to watch YIFY MKV on Android, you need to convert YIFY MKV to Android supported video formats (e.g. MP4) first. It can be done effortlessly along with some help from a prefessional Android video conversion tool.
Here Brorsoft Video Converter is highly recommended. With it, you can easily and quickly convert MKV files to a decent format like MP4 you want keeping the best quality. Then you can play Yify mkv files on Galaxy Tab, Galaxy S7, Kindle Fire HD, Nexus 7 with ease. Besides Yify MKV, it can also convert among almost all popular video/audio formats, including MP4, MOV, AVI, WMV, FLV, MPG, MP3, OGG, WMA, etc. If you are using a Mac, please turn to Video Converter for Mac.
Read More in this blog...
How to Add subtitles to AVI?
How can I save iMovie to MP4 file
How to convert MOV to WMV for Windows Movie Maker
Work with the Pentax K-3 II MOV in Windows Movie Maker
Convert Yify MKV to Android friendly format
The tutorial will take the Windows version of the video converter. Encoding Yify movie to Android on Mac is almost the same. Just get the right version.
Step 1. Import source videos
Install and run this Yify movie converter, add the .mkv videos which you want to convert by directly dragging them to the main window of this program. Another way to import files can be done with clicking the Add button. 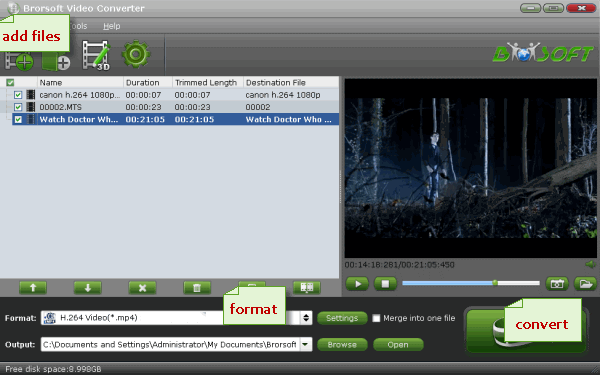
Step 2. Select Android supported format
elect an Android friendly format, e.g. H.264 .mp4 for conversion. Basically the "Common Video -> H.264 Video (*.mp4)" is a universal format for Android tablets and smartphones. Besides, there are optimized formats for Samsung, Motorola, Acer, Asus, Sony, Toshiba, HTC, etc branded Android devices; choose a proper one as you need. Or depends on your device, you can choose a suitable video format from "Android" catalogue. 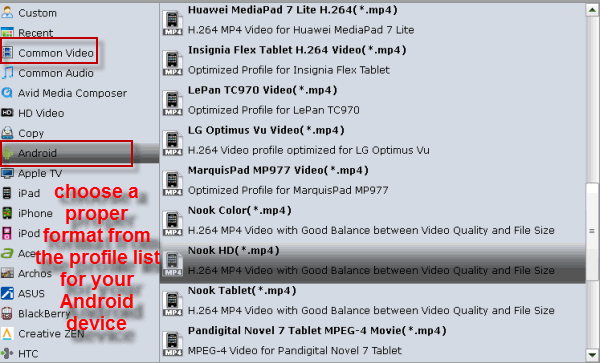
Tip- Video/Audio parameter settings:
If you need, you can click Settings to set the video parameters like bit rate, resolution, frame rate, etc. Remember the file size and video quality is based more on bitrate than resolution which means bitrate higher results in big file size, and lower visible quality loss.
Step 3. Start converting videos
When all settings are done, simply click the Convert button to begin the conversion from Yify MKV to Android MP4 format. When the conversion is finished, you can import and play your Yify videos on Android tablet or phone with the best quality.
Method 2. Install 3rd party video player apps on Android
Alternatively, you can also try to install a video player for Android that can play MKV movies as well as other AVI, WMV, MPG, MOV, etc. videos. If you search online, you will find there are many free MKV players for Android in the "Google play" and most of them are free. Popular Android MKV players include Mobo Player, MX Video Player, RockPlayer, mvideo player and Dice player, etc.
Note: There are a lot of user feedback to say "None of the Android player changes MKV file size and resolution, though there are so many MKV players for Android, many of them can't play HD 720p or 1080p MKV movies in VP8 codec with high quality on your Android device. Something even worse, some apps will slow download your device.
OK. We’ve listed the two possible solutions for you to view Yify movies on Android. Personally I prefer the first way. It takes some time, but works all the time.
More Topics:
Convert MKV to MP4
Convert MKV to iTunes
Import MKV to Premiere
Convert MKV DTS to AC3
Convert MKV to Sony PS4 playing with Plex
Converting H.265(HEVC) MKV to H.264 MP4
How to Convert MTS to YouTube on Mac OS X
How to Repair MKV video files with no Sound?
MKV files Not Working with Apple TV 4 via Plex
Watch MKV movies on Samsung Gear VR 3D movies
Converting MKV to WD TV Live without Quality Loss
Workaround to resolve TS import to Premiere Elements
Steps to convert QuickTime MOV to TV compatible format
Stream MKV files to Samsung Blu-ray Player from PC or NAS
Software for Editing Pentax K-3 II mov files in Windows Movie Maker (Wins 10 included)
This tutorial will discuss: Importing your Pentax K-3 II mov footage into Windows Live Movie Maker.
Source From: Importing Pentax K-3 II Videos to Windows Movie Maker
K-3 II from Pentax is an advanced DSLR optimized for both high-speed and high-resolution shooting. However, things would be a little more complicated when you record some MOV videos with Pentax K-3 II and want to work with the Pentax K-3 II MOV in Windows Movie Maker.
As a matter of fact, the recorded H.264 MOV videos from Pentax K-3 II are highly compressed and thus are not fully acceptable by editing software including Windows Movie Maker. If you need to import Pentax K-3 II MOV video to Windows Movie Maker, it’s suggested to convert Pentax K-3 II MOV to Windows Movie Maker supported format like WMV, which is the best codec with best results when working with Windows Movie Maker. 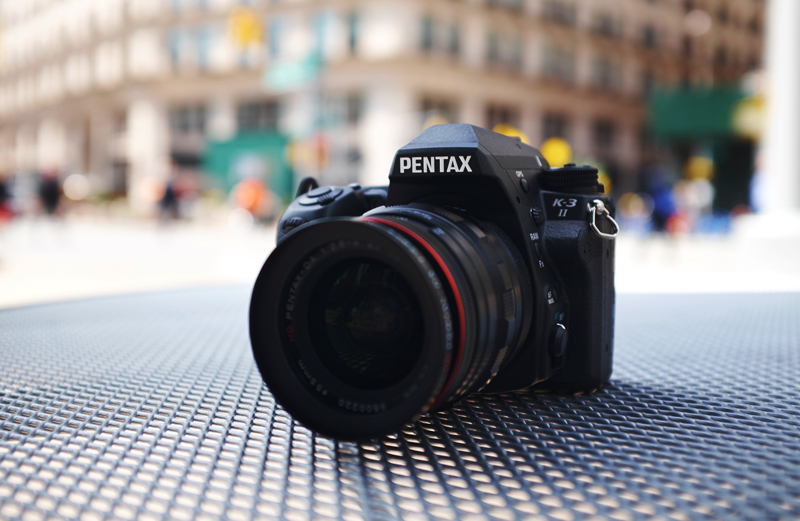
READ MORE in this blog:
How to Add subtitles to AVI?
How can I save iMovie to MP4 file
Guide Converting Sony 50P MTS to smooth 25P MP4
How to convert MOV to WMV for Windows Movie Maker
Convert and Import Pentax K-3 II MOV to Windows Movie Maker
Step 1. First you need to download Brorsoft Video Converter. Overall, the program is the best Video Converter for Pentax K-3 II footage, which will create a Windows Movie Maker friendly file format- WMV keeping the original quality in Windows XP/Vista/Windows 7/Windows 8/Windows 10. Besides Movie Maker, this software can also export professional encoders like DNxHD for Avid, MPEG-2 for Premiere Pro, Sony Vegas and more.
Step 2. Launch the MOV to Windows Movie Maker Converter; click "Add Video" and load your .mov files from Pentax K-3 II. This program supports batch conversion, so you can add multiple files into it at a time. 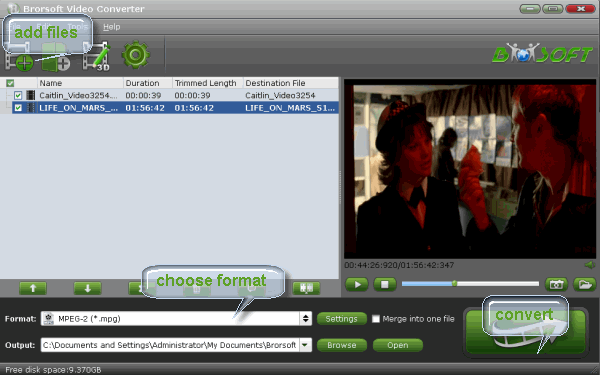
Step 3. Hit the Format box and select HD Video -->WMV HD(*.wmv) on the dropdown menu as output format. Besides, you can also choose Divx HD(*.avi) as output if you have not installed the .wmv codec.
Tip: Click "Settings" button; you can adjust video and audio settings, including codec, aspect ratio, bit rate, frame rate, sample rate, and audio channel.
Step 4. Hit "Convert" button to let the Pentax K-3 II MOV to WMV for Windows (Live) Movie Maker conversion begin.
When the conversionon finished, check the generated WMV video, you will certainly be satisfied with its final video quality. You can now load Pentax K-3 II MOV files to Windows Movie Maker fore further editing.
More Topics:
iMovie 11/09/08 crashing ? Solutions
Import H.265 to Windows Movie Maker
Edit OBS Files in Windows Movie Maker
Play MP4 on TVs (Samsung TV included)
Import Nikon MOV to Windows Movie Maker
How to Repair MKV video files with no Sound?
Make your iPhone A 360 Camera Instantly Nano
Edit Nikon D7800 mov files on Mac OS X and Windows 10
Tips and Tricks for DJI Phantom 3 & 3DR Solo Smart Drone
Edit Sony RX1R II 50Mbps XAVC S files in Final Cut Pro X
Stream MKV files to Samsung Blu-ray Player from PC or NAS
Convert Blu-ray DVD for D-link Boxee Box Compatible format
Adjust H.265/HEVC files to H.264 format for playing/editing/sharing
Tips and Tricks for DJI Phantom 4 & Yuneec Typhoon Q500 4k videos
How to Export MP4 file from iMovie
Summary: This article offers you step-by-step instructions on saving an iMovie as an mp4 file. Learn details now.
iMovie is the fastest and easiest way to turn home movies into dazzling Hollywood-style hits. After editing, you may want to save iMovie as an MP4 video, which is widely supported by popular media devices, players, websites, etc. Now read on and you will find two options to export iMovie to MP4 easily.
Option 1: Export Movie Video to MP4 Using QuickTime
1. Launch the iMovie and get into the main interface. Click "Share > Export using QuickTime" at the top menu bar. 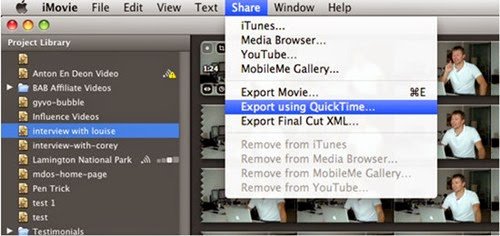
2. Then a window named "Save exported file as..." pops up. Click "Export" option and find "Movie to MPEG-4" in the drop-down menu. If you need to make some settings to the file video format, you can click Settings button; if not, directly hit on "Save" button to export a mp4 file from iMovie. 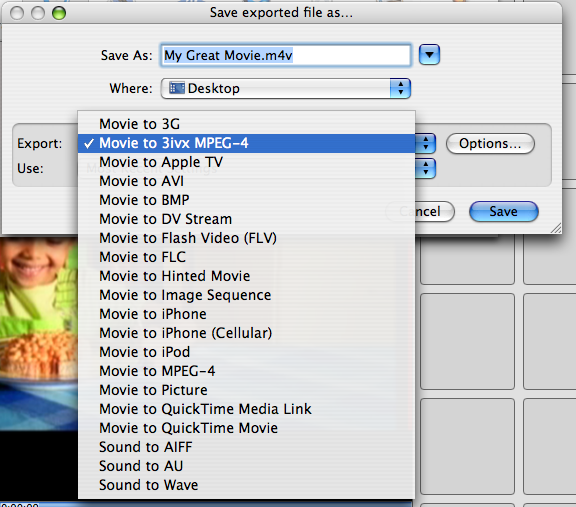
Note: Using the above way, you can export iMovie video to MP4 files easily. However, the exported iMovie files can't be recognized by your device or rejected by the video sharing website sometimes due to the video/video codec incompatibility issue. In this case, you can seek for a better method.
Option 2: Convert iMovie Video to MP4 with third-party app
Based on our testing, we found Brorsoft Video Converter for Mac is the best software to help you out. It can convert iMovie video to MP4 as well as AVI, WMV, FLV, 3GP, MPG, etc. so that you can watch them on computer, portable media players or upload to YouTube, Vimeo, Facebook, etc. What's more, this iMovie to MP4 converter can also works well with different videos from other NLEs like Final Cut Pro, Adobe Premiere Pro, Avid Media Composer, etc on Mac OS X (El Capitan included) to meet your different needs.
More Reading...
How to Add subtitles to AVI?
Guide Converting Sony 50P MTS to smooth 25P MP4
How to convert MOV to WMV for Windows Movie Maker
Guide on converting iMovie output to MP4 video
Step 1. First of all, export your iMovie videos by selecting "Export using QuickTime ...">save your videos in MOV or other offered formats.
Step 2. Launch Brorsoft Video Converter for Mac. Click the "Add Video" or "Add from folder" button to find the videos that you want to convert to MP4. Here you can import multiple videos. 
Step 3. Click on "Format" bar, and select output format from the drop-down list. H.264 and MPEG-4 encoded MP4 formats are available. For some common portable devices, optimal presets are listed for you, such as Android, iPad, iPhone and so on. Choose one you need. 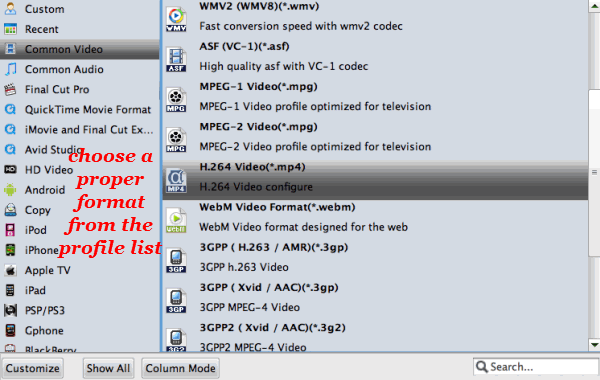
Tip: If you like, you can click the "Settings" to set parameters like video codec, resolution, bitrate, frame rate, audio codec... for your devices.
Step 4. Click the "Convert" button to start iMovie to MP4 conversion on Mac OS X. You can get an decent MP4 video after the short conversion.
More Topics:
MTS to iMovie
M2T to iMovie
MKV to iMovie
MP4 to iMovie
WMV to iMovie
TiVo to iMovie
FLV/F4V to iMovie
iMovie 11/09/08 crashing ? Solutions
Play MP4 on TVs (Samsung TV included)
How to Repair MKV video files with no Sound?
Edit Nikon D7800 mov files on Mac OS X and Windows 10
Edit Sony RX1R II 50Mbps XAVC S files in Final Cut Pro X
Convert Blu-ray DVD for D-link Boxee Box Compatible format
Adjust H.265/HEVC files to H.264 format for playing/editing/sharing
How to Merge/Add SRT, or .ass/.saa Subtitles with AVI in Seconds
Looking for a quick and easy way to merge srt, or .ass/.saa subtitles with an AVI movie or video?
Then this tutorial is perfect for you, because here I will show you step by step how to combine srt, or .ass/.saa subtitles with AVI in just seconds using a free program called Brorsoft Video Converter for Mac and Wins.
Preparations for Embedding subtitles to AVI:
First, find the subtitles online at Opensubtitles or Subscene (you have other options) by searching for the movie's name and the language you'd like. When you find suitable subtitles, make sure your AVI video and subtitles names are the same.
Then, get an effective subtitle to video converter. Brorsoft Video Converter Ultimate is the right choice. With this smart converter, you can add subtitles in .srt, .ass and .ssa to AVI videos with just a few clicks. It can not only attach subtitles to AVI, but also supports many other video formats, like MKV, MKV, MOV, WMV, etc. What's more, it also helps to set the subtitle size, subtitle style, etc according to your preference. Besides adding subtitle files to your video, it is an all-in-one program with many other functions, which enables you to edit videos, convert video, rip Blu-ray/DVD easily and quickly, etc. If you are running on Mac OS X to add external subtitles to MKV, MP4, AVI, etc, turn to Brorsoft iMedia Converter for Mac. 
 (Note: Click here for OS X 10.5.8)
More Reading...
Guide Converting Sony 50P MTS to smooth 25P MP4
How to convert MOV to WMV for Windows Movie Maker
How to Add subtitles to AVI?
Step 1. Import AVI video
Click "Add" button to import the AVI video file which you want to add subtitle .srt or .ass/.saa to. Or simply drag and drop the AVI video into the interface of program.
Tip: Before loading source video, you need copy .srt file to MP4 video folder, rename .srt file according to the video name. And if you add more than one .srt files to the MP4 folder, you can rename the .srt file name like this: if source MP4 file name is “michael.mp4”, the .srt file names can be “michael001”, “michael002”, etc.
2. Embed subtitles into AVI video
Click on "Edit" button, the video editor will pop up. Tap "Subtitle" option and check the "Enable" icon. Then, by clicking on "Browse" to import your *.srt, *.ass, *.ssa subtitle file you've downloaded. After the subtitle is loaded, you can preview it. 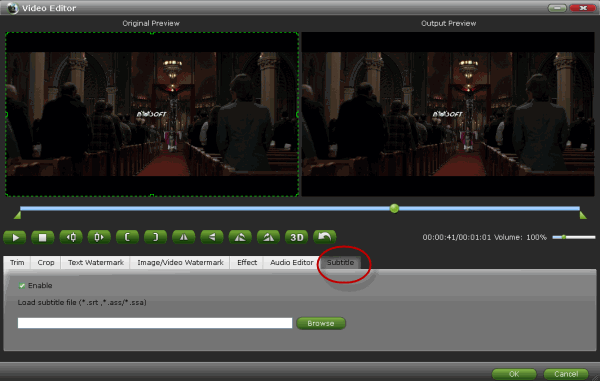
Tip: You can change the subtitle size, style, font if necessary. When everything is done, simply click "OK" button. Plus, you can also add watermark, apply effects, and crop, trim your AVI files in the above video editing window.
3. Set output video format
To add subs to AVI (to keep the output video as AVI with subtitle), click the "Format" drop-down button to select AVI format from the Common Video profile.
4. Finish AVI subtitles merging
Click the "Convert” button to start adding SRT or ASS, SSA to AVI video, when the conversion is completed, the subtitles file will be embedded into the output AVI video. Now you can play your AVI files with subtitles anywhere.
More Guides:
Possible solutions to MKV no sound
How to Attach subtitle to MKV Videos
Best 3 Blu-ray Player Software for Mac
How to Convert MKV to MP4 with Subtitles
Guide: Convert and Play MP4 on DVD Player
Alternative way to get ProRes from Sony Vegas
Edit Sony PXW-FS7 xavc files in Final Cut Pro 7
Easy way to convert H.265/HEVC to H.264 video
Tips for Playing MKV files on Apple TV via Plex
Converting Blu-ray to H.265 MP4 for Playing on 4K TV
Can't import DJI OSMO 4K files in Premiere CC-2015.3?
How to convert MOV to WMV for Windows Movie Maker
Converting Blade Chroma 4K video to work in Premiere Pro
Best 5 Websites to Download Subtitles for Movies or TV Shows
How to convert and import MOV files to Premiere Pro CC 2015.3
Convert Game Capture HD60 Pro H.264 videos to Final Cut Pro X/7/6